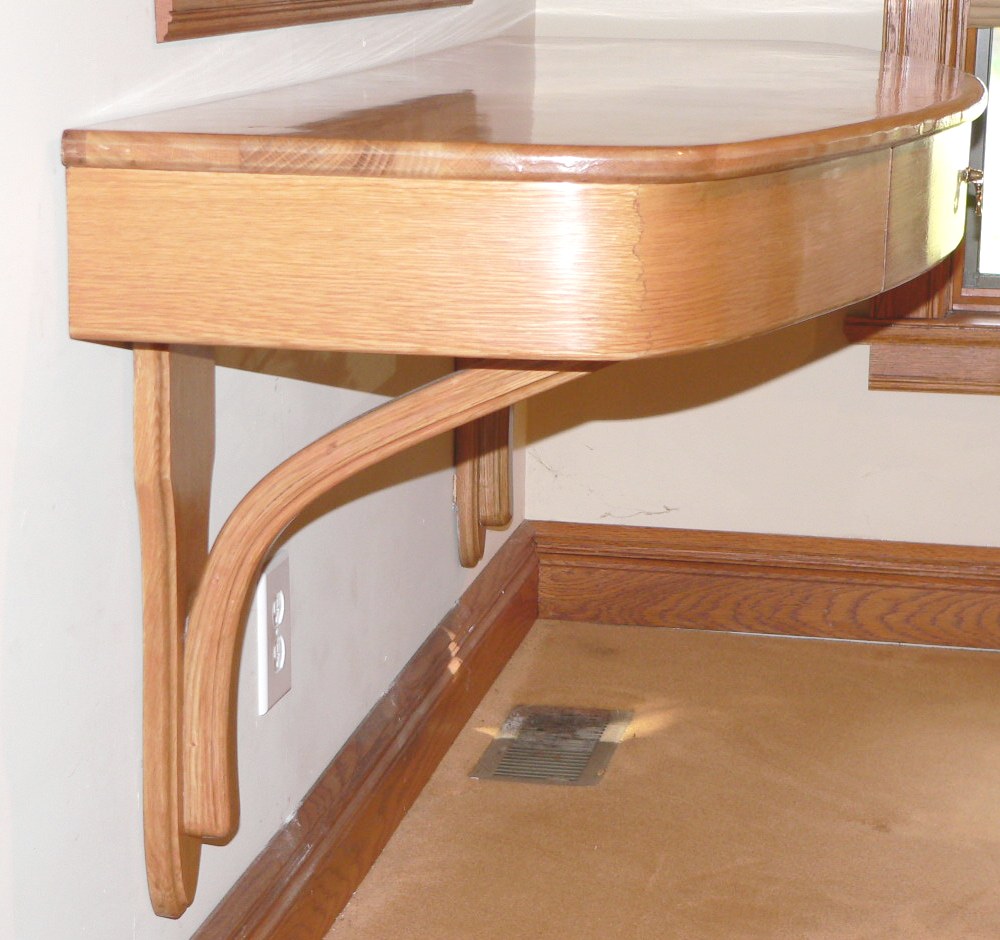
Navigation Menu+

Wall Hung Table

Wall Hung table

Making a table
The design process used cannot really be put into words.  It blends a vision, an action plan, and selection of materials to get the job done.  Whatever the project, the process is fluid and small details change as the project progresses because of a defect in available materials, after seeing the object a visual refinement is needed or sometimes you savage a mistaken cut.  Rarely, a set of detail drawing exists.  Most times a few measurements and a sketch or a picture is the extend of the design.  Usually the project itself is the drawing board.
As an illustration, I will take your through a recent project to design and construct a wall hanging hall table.  After making the piece, I decided to keep it and use the table as a desk instead of selling it to the original customer.  This decision in part was because the customer changed her mind about the finish – opaque lacquer after the construction was completed – and I could not bring myself to covering the wood grain in the selected white oak material.  Another reproduction was made using poplar and birch.
The design
The customer provided a picture from a magazine of blond colored table hung on a foyer hall.  The table had a bow front.  Using proportion from objects in the photograph – this a place where experience with architectural woodwork pays off – it was determined that the table was about 15 inches at the ends and about 22 inches at the apex of the bow front.  The table had an apron around 6 inches deep with a single large drawer in the middle. The ends appeared as though they formed a gentle radius at the junction with the bow front.  The table length was somewhere between 5 and 6 feet. The table was supported by two large ogee brackets.  The brackets were the first deviation from the picture because they looked heavy and destroyed the illusion that the table was floating in space.  A steam bend brackets (shown in later photographs) were substituted.
Given these measurements, it was decided to use white oak as the material and steam bend the apron and brackets.  Quarter inch thick white oak can be bent to a 2 inch radius so this material would be perfect to form a continous surface for the apron.  Laminating three pieces created a piece with enough rigidity to support the top and allow fastening to the carcase frame.  From previous projects successes using thicker lumber , the bracket consisted of a lamination of two 3/4 inch thick bends.  To provide the strength to support the piece as a cantilever off the wall, it was decided to use a torsion box construction method.


The first step to any steam bending project is construction of the bending form.  The bending form is also the drawing board of the design process where you work out general dimension of piece.
You need to start with a bending form made from lamination for 3/4 plywood. The taper sides allowed for spring-back in the pieces

You need to start with a bending form made from lamination for 3/4 plywood. The taper sides allowed for spring-back in the pieces

The only difference between the shape of the final piece and the bending form is the need to provide for “over bending” because the piece will “spring back” .  Although this “tool” may look rough, its construction must be strong enough to withstand the clamping pressure necessary to force a piece of wood against its natural instincts and all surfaces must be machined so the surface is smooth and plumb.  Any defect in the bending forms telegraphs into the piece being bent.  Experience has taught that it takes about 3 to 4 hours to construct the form using plywood scraps, nails, screws and glue.  The most important tool however is a router with a bottom bearing pattern bit used to clean up the bending surface between consecutive layers of plywood.
 
 The next step was to select a six inch wide by 10 feet white oak board with straight and no knots.  Any grain twist is likely to “blow out” during the bending process.  This board was resawn with a bandsaw to yield two 5/16 inch pieces after milling away the saw marks.  The pieces were placed in a steam chamber constructed from 10 inches round heating ducts that uses a electric turkey fryer as the steam generator. (shown without the fiberglass insulation wrapping)
 
 The original plan was to bend and glue laminate these two pieces as one continous piece but reality destroyed the dream.  The time it took to bend a piece around the form allowed the wood to cool too much before the second end could be forced to the form’s radius.  The board cracked at the second corner radius on both pieces after forming a perfect surface at the first corner.    The cracked face created a mental dilemma because the original concept was a continous formed surface – how do you get two good face looking out.  I glued only the center section that will form the drawer front (31 inched in the center of the bow front).   By cutting this section out after the glue dried, I was able to flip the ends so one good face looked out for the corners.  I was not pleased with the appearance because the “good corner” had some cracked grain on one of the pieces.   I decided to make a 4.5 feet section(1/4 inch thick)  that included the side apron and the front apron to point where it met the drawer.  These pieces were steam bend and then glue laminated to original project.


At this point, a small digression for any project that glue laminates.  You can follow blogs and magazine articles that talk about this subject and arguments if the yellow glue that you can buy at Home Depot or Lowes is sufficent for this operation.  My experience – or the myth that my minds tells me is correct – is that the yellow glue creeps too much for this stressed application and the short setting time can be problematic when during the summer months.  I prefer the thermoplastic, rigid glue line obtained from the “plastic phenolic resin glues” that are powders mixed with water immediately before using.  I have found success using PPR available from Woodworkers Supply or other internet catalog stores.


Using the bending template after modification to remove the “overbend” as a gluing form force the glue lamination to conform to the intended design.  Ends are allowed to overhang and will be trimmed to the final measurement later with hand tools. 
After adjusting the template an ash rail-stile-panel was made to conform to the pattern.

After adjusting the template an ash rail-stile-panel was made to conform to the pattern.

At this point the bottom surface of the torsion box is made from white ash (had enough secondary wood quality on hand) and 1/2 birch plywood panels.  This surface used the rail and stile construction method.  The apron is attached with pocket screws (no glue so any expansion and contraction frame would not transmit to the apron face).
Take out the twist in the steam bend by screwing it into the top mirror image frame.

Take out the twist in the steam bend by screwing it into the top mirror image frame.

The top torsion box member is formed in similar fashion but top member excludes the floating birch plywood panels.  A top rail at the drawer opening is set back so it is not visible when the drawer is open.  This top frame is attached to the internal web and apron with screws.  All overhanging pieces are cut to the final dimension at this point using handsaws and razor cut scribe lines
The drawer front is made from two laminations glued and cut from the center of the original sides.  To make the drawer construction stronger and make the machining easier, a secondary surface was created using a full length white oak board and two white oak scrap blocks.  The drawer’s dovetails are machined in the blocks and then glue laminated to full length board.  The outer surface is cut to the arc formed by the drawer front lamination using a bandsaw.  After cleaning up and custom fitting, board is glued to the drawer front lamination.  After the glue dries, the inner surface of the drawer is cut with a bandsaw to a modified mirror of the front surface.  Later, the drawer botttom surface is covered with a red felt.
Cheater pieces allow a 90 degree alignment to fit into dovetail machine

Cheater pieces allow a 90 degree alignment to fit into dovetail machine

The glue lamininated brackets that supports the table from the wall are trimmed so that it forms a 90 degrees angle with the rear (wall) surface.  This step uses a framing square to scribe the angles, hand saw, and hand plane for the final finesse.  The bracket attaches to the bottom torsion box member using screws (plugged counter-bore holes) and the wall support bracket with screws (blind) and glue.  The wall support bracket attaches to the torsion box with glue and pocket screws.
Almost there and ready for finish and installation

Almost there and ready for finish and installation

You should note the 1/2 inch holes drilled in the torsion frame along the front and side edge.  These holes allow access so the top can be screwed to the top torsion frame members.


After sanding, the surface was sealed using Penetrol.  This product is a resin solvent blends sold to thin oil based paints before spraying or to lessen brush marks.  If allowed to dry for at least three days, the material is an excellent primer for raw wood.  If left untinted – as used in this project – it accents the natural grain and color of the wood.  Adding artist colors, Penetrol makes an excellent base for custom stains or opaque finishes.  The open pores were filled with a paste filler that were tinted to a light brown red using Indian red and Ochre yellow artist pigments.  After drying and sanding with 220 grit sandpaper to remove the excess filler and level the surface, multiple coats of Sherwin Williams waterborne gloss polyurethane were wiped on.  The finished surface was leveled with steel wool and scruff buffed with a abranet 500 pad attached to a random orbital sander. A crystal beewax added the final luster.


Install required a 2 3/8″ X 1.5″ X 58″ framing lumber member attached into the wall studs.  The attachment beam fits between the upper and lower torsion box members.  After sliding the table onto the support beam, four 3 inches long screws were drive from underside. Counter-bored holes through the bottom torsion member meant that the screws attached the support beam to the top torsion member. Another four screws were driven through the bottom torsion member into the support beam.  The front edge was the table was leveled to the back edge using thin slims glued behind the wall support brackets.
guitartable wsith brackets
Now you have seen a project from start to finish.  What project do you have in mind.  Contact me with comments, questions or ideas.

Wind Blows Table

Posted by on 5:04 pm in Console, Fairfax Virginia, reclaimed wood, Tables | Comments Off on Wind Blows Table

Wind Blows Table

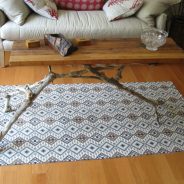
Wind Blow Strong wind is a poorly trained arborist tree trimmer who leaves the job clean-up to you. A 2012 Deracho wind blow harvested large branches from a Sycamore tree.  During clean-up operations branch intersections were directed to air drying and future ‘parts’ to make this table’s support structure. The natural bark skin provides the support structure’s final finished surface. Chestnut salvaged from roof rafters A carpenter friend in Upstate New York provided chestnut roof rafters salvaged from a old garage tear...

read more

Small dining table

Posted by on 3:49 pm in Dining Room, Fairfax Virginia, Foldng, Kitchen, Tables | Comments Off on Small dining table

Small dining table

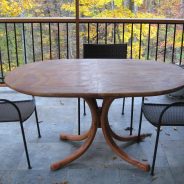
A small dining table offers an elegant option for those with limited dining area space.  The 36″ x 42 ” footprint offers a tightly spaced 4 person dining table. The two-directional splayed legs create a very stable footing that maximizes legroom for this seating arrangement. Simply flip up the two (or one) 6″ x 42″  expansion leaves for a spacious 48″ x 42 ” hexagon shaped eating area (one = 42″ x 42″) with seating for 4 people. Six people can sit at this 48″ x 42″ configuration....

read more

Bistro table

Posted by on 3:09 pm in Fairfax Virginia, Faux surface, Glue Lamination, Other, Painted Furniture, Tables | Comments Off on Bistro table

Bistro table

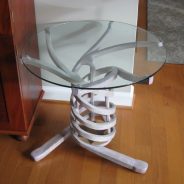
Bistro table features a spiral pedestal formed by three legs. Laminations of white oak create the twisted spiral leg shape. After hand-shaping the leg, a multi-layer paint topcoat imparts a translucent quality to the surface. A 30 inches diameter glass top sits 27 inches above the floor. Watch the How it was made video on YouTube.

read more

Patio table with Sandstone top

Posted by on 9:27 pm in Fairfax Virginia, Pedestals, Steam bending, Stone and Wood, Tables | Comments Off on Patio table with Sandstone top

Patio table with Sandstone top

Patio table with sandstone top features accommodations for six around 5 feet X 3 feet elliptical top. Four Rainbow sandstone landscape flagstone (30” X 18” – metric nominal) slabs are pattern matched to showcase a nature-painted dining surface. After cutting the elliptical pattern, the stones attach to a ¾ inch plywood substructure with fiberglass and epoxy. Edge profiling readies the top for applying a water-repellent sealer. This top perches on a steam bent white oak pedestal 30 inches above floor level. Lamination of two ¾ “thick white oak...

read more

Elliptical coffee table

Posted by on 4:38 pm in Coffee, Fairfax Virginia, Faux surface, Painted Furniture, Tables | Comments Off on Elliptical coffee table

Elliptical coffee table

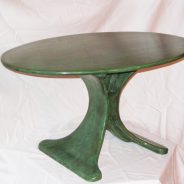
Elliptical shapes visually soften the hard-edge appearance of a circle.  Essentially, ellipses are “rectangular” circles. An ellipse with dimensions similar to the “golden rectangle” shape has more visual appeal than a circle. This coffee table’s design uses “golden rectangle” ellipses.  The elliptical top (36 inches x 24 inches) sits on a base (18 inches tall) created from intersecting ellipses. The solid Poplar construction is faux finished to a jade like appearance with multiple layers of custom-tinted varnishes. This small table’s...
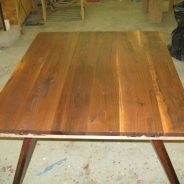
read more

Reclaimed pine table

Posted by on 4:44 pm in Dining Room, Fairfax Virginia, reclaimed wood, Tables | Comments Off on Reclaimed pine table

Reclaimed pine table

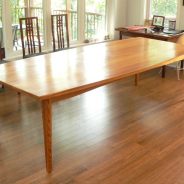
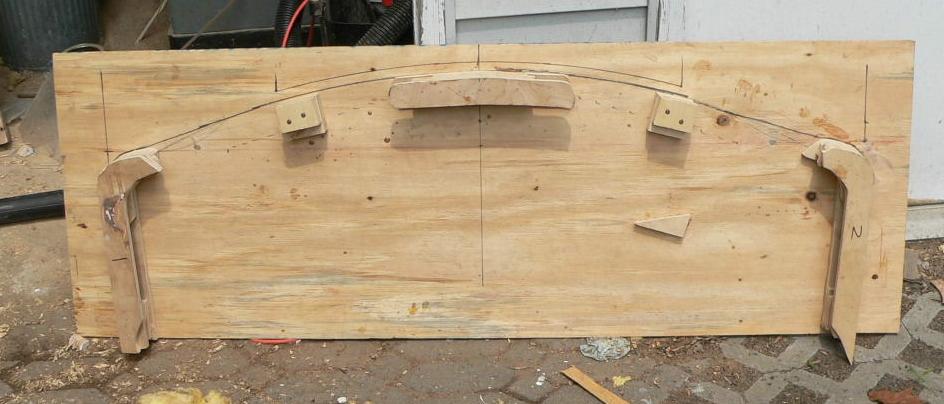
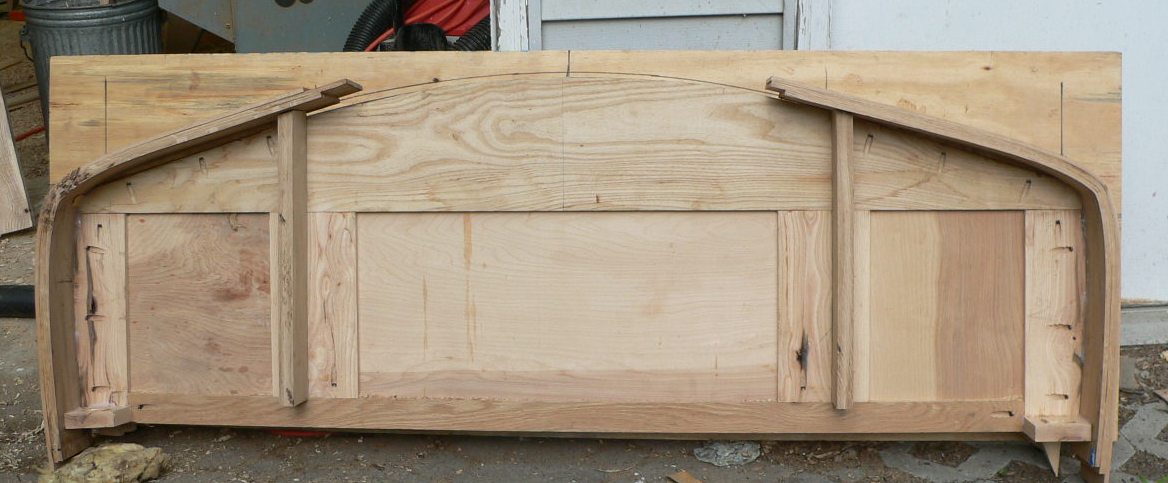
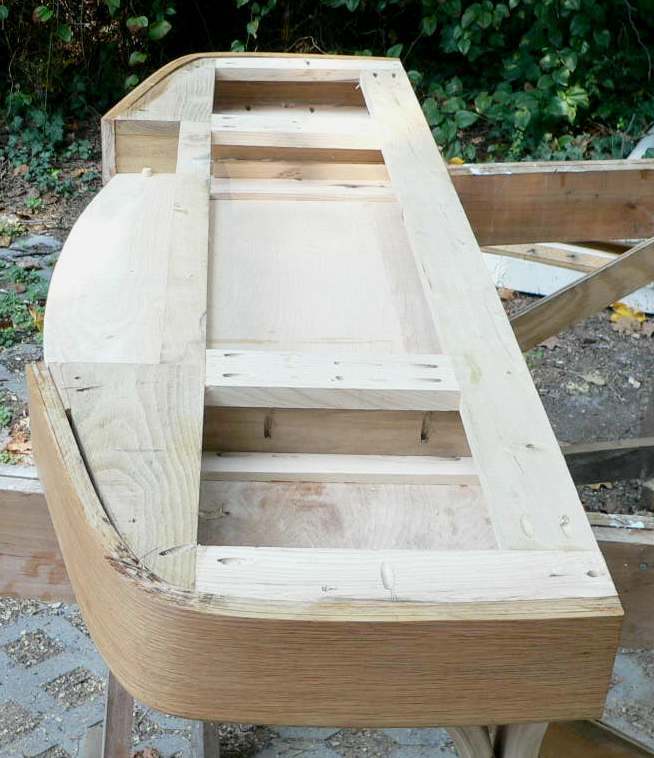
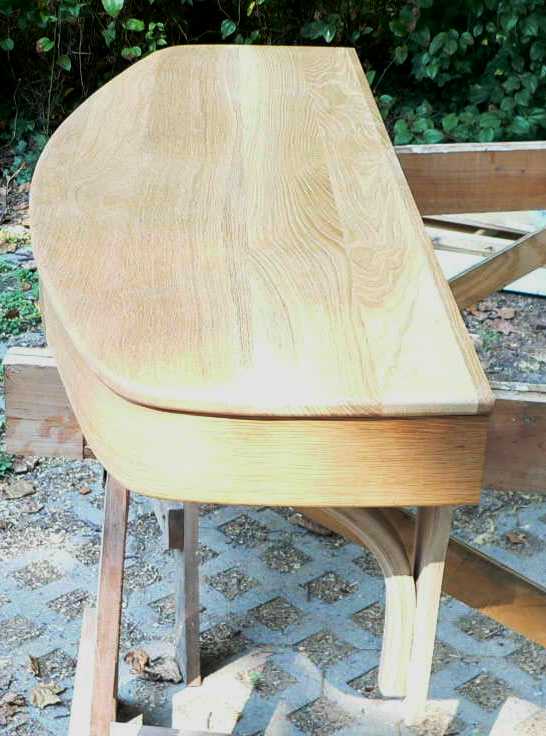
Reclaimed pine from architectural salvage provides a way to use Pine harvested from established forests (harvested ca. 1900). These forests created lumber with tight grain (up to 20 growth rings per inch), reddish caramel color and a harder surface than the quick growing pine harvested currently. A reclaimed pine flooring source became available about the same time a custom wanted a lighter-colored wood dining table that had some “character” . The customer specified a 110 inches long table with arched sides – 3.5 inches drop...

read more

Multiple use side table

Posted by on 3:09 pm in Fairfax Virginia, Pedestals, side, Steam bending, Stone and Wood | Comments Off on Multiple use side table

Multiple use side table

A side table stands about 18 to 24 inches tall.  The height and usually small surface area top accommodates placement where you want an usable surface within arm’s reach when seated in an armed chair or sofa.  The low stature allows usage as a bedside table or plant stand but it makes the table impractical as a comfortable table for eating or writing. Many examples of this table type are found in this portfolio. Billets split from a black walnut log form all the support structure elements of this side table. The natural live-edge formed...

read more

Plywood edge furniture

Posted by on 11:46 am in Fairfax Virginia, Pedestals, side, Stone and Wood, Tables | Comments Off on Plywood edge furniture

Plywood edge furniture

Plywood’s perceived features: sheet material of standard width, length, thickest building materials available at the home center, cheaper than solid wood ($/square foot), more dimensionally stable than solid wood, thin surface veneers prone to splintering and “sand-through” during finishing, requires edge treatment to hide the ply construction, Bottom line many think plywood should be restricted to unseen surfaces ( e.g. drawer bottoms, cabinet shelves and  backs) or not used at all in fine furniture. Other than...

read more

Shabbath Ritual Table

Posted by on 5:00 pm in Fairfax Virginia, Tables | Comments Off on Shabbath Ritual Table

Shabbath Ritual Table

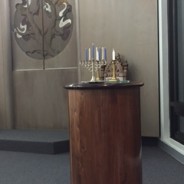
I received a request from a synagogue to construct a round table that could be used to store items used during Shabbath services.  The request was pretty much non-specific – round cabinet, 36 inches tall, about 24 inches in diameter with a door and drawer.  No wood species was specified. I knew that I could create cylindrical objects from a multifaceted polygon to make the main body using the technique mastered for a previous project ( Rolling up a circle) (Smooth the surface to round).  I had a supply of 4/4 walnut on hand so the it...

read more

Round accessory table

Posted by on 4:49 pm in Fairfax Virginia, Pedestals, Round, side, Sofa, Tables | Comments Off on Round accessory table

Round accessory table

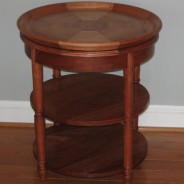
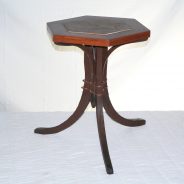
This simple round accessory table required the use of every major pieces of equipment in the shop.  The project incorporated the diverse skills of geometric layout, steam bending, glue lamination and lathe turning.  Ironically, the complex skills to make the parts ended up being screwed together – not a lot of fancy joinery required to complete the round accessory table. The round accessory table construction started with making the segmented octagonal top which is then cut into a circle and profiled on a lathe. The segments were cut...

read more